
When delivering training, I always make a point to ask the attendees what they know about calcium sulphate bases. I usually get the same answers, “buff it off & put a smoothing compound down”, “it’s not my job to grind it”, or even worse “never heard of it”.
Obviously, the most worrying statement is “never heard of it”.
Subfloor identification is a very important element of being a floor layer due to the different types of substrates we come across, day in, day out. We must understand the process to achieve a perfect, issue-free floor, no matter the substrate. In this article, I want to talk through some facts when dealing with calcium sulphate screeds.
Understanding calcium sulphate substrates and their properties
Calcium sulphate substrates, also known as gypsum, have become increasingly popular over recent years due to their quick drying times, ease of application and thermal properties when used in conjunction with underfloor heating. With this rise in popularity, it is important to understand the preparation processes needed to ensure that any application of preparation products is successful.
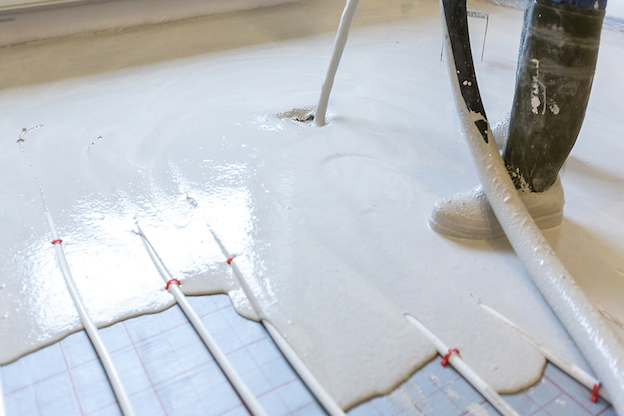
Calcium sulphates are most commonly applied as a pumpable screed. They are often used to renovate both damaged and uneven industrial floors as well as being ideal for new build projects. This has some obvious advantages over some of the more traditional counterparts. It is much easier to install and it requires no physical compaction. Unlike cementitious bases, gypsum doesn’t shrink to the extent that a cement-based material does. This stability means that the screed is a lot less likely to crack as it dries and hardens.
“Unlike cementitious bases, gypsum doesn’t shrink to the extent that a cement-based material does.”
The surface of a calcium sulphate screed is generally a lot tighter and smoother than traditional screeds and concrete. The colour is also generally lighter and sometimes almost milky in appearance. In some instances, it can be pink-red or greenish, depending on the manufacturer. When laitance is present, it takes different forms, from a waxy/shiny surface to a rough, friable surface. When dealing with laitance, it is always good practice to perform a scratch test, helping you select the correct tooling and machine for the surface preparation.
In earlier times, calcium sulphate used to be renowned for forming a lot of laitance. However, as technology and material quality have improved in recent times, this is no longer necessarily the case. There are different manufacturers and qualities of calcium sulphate that have much less chance of forming laitance and which produce denser surfaces. But how do we identify it? The best way is to simply either ask the site manager or the screeders if they are on site. This way you can get all the information on what type and which manufacturer it is, and you can read their Technical Data Sheet (TDS).
Preparation of calcium sulphate subfloors
Calcium sulphate bases are no different to any other base when it comes to preparation. When they are encountered, the preparation of the subfloor using mechanical surface preparation equipment is vital. This step allows the removal of any weak surface layers, laitance, and contamination. It is these things in particular that are likely to impair the adhesion of any products that may be applied to the surface. After preparation, the surface should always be thoroughly vacuumed. This is not your run-of-the-mill Henry vacuum, or a vacuum that’s the deal of the week at your local shop! Domestic vacuums do not remove all the fine particles which surface preparation can leave behind. An extraction unit with either an M or H classification is required.
Is the subfloor dry? Just like traditional sand and cement, or concrete subfloors, calcium sulphates also require a moisture test to find out whether you need to apply a moisture control system or not. However, there are a few different factors you will need to know. If we have an %RH measurement above 75%RH, then a moisture control product must be applied. With calcium sulphates, we need the %RH reading to be a little lower than we would with traditional concrete and sand and cement screeds. This is due to the way in which calcium sulphates dry and harden, which is a different process from that of cementitious bases. Cementitious subfloors like to be wet and gain their strength the longer they are wet. This is the opposite for calcium sulphate screeds. The more moisture in calcium sulphate subfloors, the weaker they are because they gain their strength as they dry.
“The more moisture in calcium sulphate subfloors, the weaker they are because they gain their strength as they dry.”
If we apply moisture control before the %RH reaches a suitable level, then the calcium sulphate may re-weaken underneath the applied products, leading to the possibility of de-bonding. Generally, calcium sulphate bases have a lower maximum limit before they are able to have moisture control systems applied. This is to allow sufficient hardening of the base so that it can withstand any stress that may be exerted on the surface when further products are applied.
When we have a calcium sulphate base that has a measured moisture content of 75%RH or lower, then we do not need to apply a moisture control system. However, we do have to create a barrier to prevent the possibility of sulphates (within the screed) reacting with any cement-based smoothing compounds. Failure to do this may again result in a smoothing compound de-bonding from the subfloor. We can create this barrier with primers and resins. When applied, these form a layer between the two products. This barrier prevents the products from physically coming into contact, allowing the smoothing compound to dry and remain intact without any detrimental effects occurring.
Calcium sulphates with underfloor heating
When underfloor heating is encapsulated in a calcium sulphate base, we must also undertake a moisture test to ascertain an accurate measurement of the %RH. We need consistent measurements of 75%RH or less. This is due to the amount of moisture still within the calcium sulphate. With all UFH (electric/water), when it is switched on, the moisture is effectively ‘energised’ and will want to move only upwards. As this moisture becomes mobile, it can accumulate in the upper layer of the calcium sulphate, which then causes the upper layer to, effectively, become more wet. This can weaken the layer and, again, potentially de-bond any products laid on top. Any reading above 75%RH will always require further drying time. This can be sped up by good ventilation and running the underfloor heating during the drying phase of the screed whilst uncovered. It is not recommended to apply preparation products to any calcium sulphate bases which incorporate underfloor heating if the moisture levels are high, and the readings exceed 76%RH.
For more information or training on Bostik’s solutions for calcium sulphates, contact our Technical Team or book onto our free training at the Bostik Academy. We believe in our motto – “Better results through knowledge”.
