Ask any experienced floor layer, and they’ll tell you the same thing – “assessing the subfloor is crucial before applying any subfloor preparation products”, and experienced flooring professionals can identify issues that the untrained eye might miss. Getting subfloor preparation right the first time to create a smooth, reliable base is well worth the time and effort it takes.
Common subfloor problems
Flooring contractors are no strangers to problematic subfloors. Here are just a few factors and effects that shouldn’t be left untreated: contaminated surfaces, water damage, protruding aggregate, undulating surfaces, quilting effects, and cracks resulting from forced drying, settlement, or natural hydration. While applying a “tried-and-true” 3mm layer of smoothing compound is often seen as sufficient, in some cases, this may not be enough to achieve a suitable surface for the new flooring.
Surface regularity
The success of any flooring installation depends heavily on the surface regularity, which varies according to project requirements and the intended use of the space. Smoothing a floor aims to eliminate any irregularities that could impact the finished surface. Some textile floor coverings can conceal various imperfections, but thin LVTs or sheet vinyl will accentuate any unevenness in the underlying screed. It’s important to note that levelling the surface requires further attention than simply smoothing it.
In domestic and specialist commercial environments, subfloors are typically laid to SR1 standard (±3mm over a 2m straight edge). While a 3mm application of smoothing compound will adequately smooth these floors, it’s essential to understand that this application will follow the contours of the floor rather than fully levelling the surface. For installations requiring a completely flat surface, such as operating theatres or precision manufacturing facilities, applications exceeding 3mm might be necessary.
Subfloors on some projects are laid to SR2 standard (±5mm). This standard is commonly encountered in concrete installations where a quilting effect has developed during curing. This quilting pattern typically mirrors the reinforcement bars (re-bars) within the floor’s construction. While a 5mm application of smoothing compound might seem adequate in these cases, it will merely follow the contours of the underlying floor. To fully level such surfaces, contractors must assess the actual depth required.
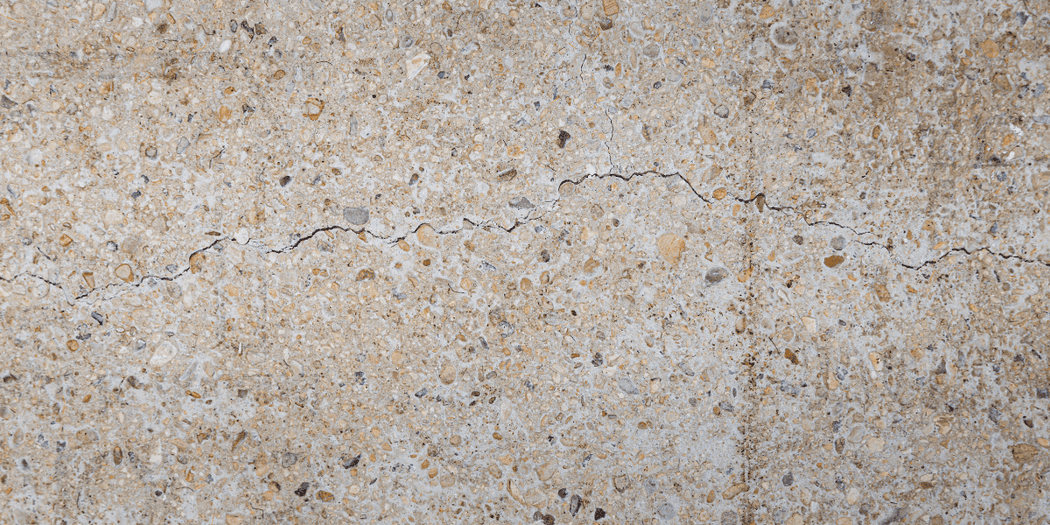
Crack repair
Cracks in screeds must be addressed before any moisture control measures or surface treatments can be applied. In all instances, it is advisable that a structural engineer be consulted to ascertain, if/where present, any cracks, day joints, or crack inducement joints are static and are no longer likely to experience any further movement. In many cases, day joints successfully slurry bonded at the vertical face to their adjacent substrate can be treated as a continuous surface. These cracks, whether caused by forced drying, settlements, or the natural hydration process, require proper repair to prevent moisture ingress and ensure long-term floor stability.
The repair process involves cutting open the cracks with a disc cutter to 40% of the slab thickness – for a 50mm screed, this means a 20mm deep cut. Perpendicular cuts are then made across the cracks at 25mm intervals. Serrated stitching pins are inserted into those crosscuts to provide lateral stability, with their serrated surface ensuring proper resin bonding and preventing movement.
Once the framework is prepared, crack repair resin such as Bostik’s RENO E742 STRUCTURE is applied to fill all joints flush with the surface. After the initial 15–30-minute drying period, the treatment varies depending on the next phase of work. For DPM application, the surface should be smoothed and left to cure overnight. For smoothing compound application, the repaired area should be covered with kiln-dried sand (with a maximum of 0.9mm grain size) until the resin is fully coated.
Moisture management
With crack repairs complete, the next critical step is assessing and controlling moisture levels, which is crucial for the longevity of any flooring installation. When relative humidity levels exceed 75% (or 65% for wood floor coverings), a damp proof membrane (DPM) becomes essential. Without proper moisture control, floor coverings can suffer from discolouration and bond failure between layers, leading to complete installation failure.
Rough or textured floors present additional challenges for DPM application, as these surfaces require more product to achieve uniform coverage. The DPM naturally pools in lower spots, potentially creating inconsistent protection. Pre-smoothing with a moisture-tolerant compound such as Bostik’s SL C955 ADVANCED creates a more uniform surface for the DPM, ensuring a more consistent coverage and better protection against moisture while often reducing the amount of DPM needed.
Smoothing compound
The final stage of subfloor preparation lies in choosing and applying the right smoothing compound. A rough or uneven substrate that might hide better beneath the carpet will show every imperfection through vinyl or LVT. The choice of compound must account for the subfloor type, intended use, and specific project requirements. For plywood and other flexible subfloors, flexible compounds are essential to accommodate natural movement without cracking and fill indents from fixings and joints. Meanwhile, areas subject to heavy traffic or substantial loads require heavy-duty variants with improved durability characteristics.
Regardless of the compound, understanding the importance of correct application thickness is crucial. The industry-standard 3mm minimum requirement isn’t arbitrary – it serves vital purposes in the installation process. This thickness ensures an adequate surface for floor covering bonding and creates a proper environment for adhesive curing. During the curing process, water within the adhesive formulation must dissipate. With impermeable floor coverings, this moisture can only migrate downward through the smoothing compound, as it cannot evaporate upward through the resilient covering material. Applications under 3mm provide insufficient depth for this moisture migration, preventing the adhesive from fully curing and potentially leading to installation failure.
Professional support and resources
Given the complexity of subfloor preparation and the variety of products and techniques available, an abundance of assistance is available. Manufacturers, including Bostik, and independent training companies offer training and resources in person or via websites, apps and video content. Technical teams can provide both on-site substrate assessment and testing, and immediate telephone support when needed. While proper preparation may seem time-consuming, it’s far more cost-effective than dealing with failed installations.
Written by Rob Russell
